computer free courses MS Word , MS Excel , MS Access, InPage , Corel Draw , Windows Installation.

Saturday, June 30, 2018

Formula in MS Excel

Entering Formula in Worksheet

Formula Building

Excel allows you to use formulas to calculate and analyze data in your worksheet. A
formula always begins with an equal sign (=), and includes cell references, and some type
of mathematical operator. For example, the formula =C4+ C5 takes the value in C4 and
adds it to C5.
Formula in MS Excel
Formula in MS Excel


Operators in Formula

Excel uses arithmetic operators in formulas to perform mathematical calculations.
Arithmetic Operators include the addition (+), Subtraction (-) , Multiplication (*),
division (/), Percent (%), and exponent (^) symbols.
You can use Logical operators, which return values of TRUE or FALSE, in formulas to
compare two values.
Comparison and Logical Operators include the greater than (>), less than (<), equal to

(=), greater then or equal to (>=), less than or equal to (<=), and not equal


If my posts are useful for you، or if there is any reduction in them so kindly comment me.

Tuesday, June 26, 2018

Inserting Symbols in MS Word

Inserting Symbols and Special Characters

When creating documents, you may need to use a symbol or special character that does not appear on the keyboard. These symbols and special characters can be accessed through the Symbol dialog box.
Inserting Symbols in MS Word


Inserting Symbols

Use the Symbol dialog box to locate symbols, characters from other languages, arrows, and other characters. Symbols inserted into documents can then be formatted as regular text.
Place the insertion point where the symbol will be inserted
From the Insert tab, in the Symbols group, click SYMBOL
Select the Symbols tab
Select the desired symbol
Click INSERT
The symbol appears in your document.

Click CLOSE


If my posts are useful for you، or if there is any reduction in them so kindly comment me.

Changing Page Size in MS Excel

Changing the Page Size

The default paper size is 8 1/2" x 11", but you can select other available paper sizes, such
as legal (8.5" x 14"). To select a different paper size:
Changing  Page Size in MS Excel
Changing  Page Size in MS Excel


From the Ribbon, select the Page Layout command tab

In the Page Setup group, click SIZE » select the desired paper size


If my posts are useful for you، or if there is any reduction in them so kindly comment me.

Page orientation in MS Excel

Changing Page Orientation

From the Ribbon, select the Page Layout command tab
In the Page Setup group, click ORIENTATION » select the

desired orientation (i.e., Portrait or Landscape)
Page direction in MS Excel


If my posts are useful for you، or if there is any reduction in them so kindly comment me.

Monday, June 25, 2018

Typing Master Pro Portable

Typing Master Pro Portable

Tying Master is a program that will work as a personal typing tutor helping you to improve your typing speed. 
Typing Master Pro Portable


Typing Master Pro Portable is a great tool when you are learning typing because it can help you to improve your typing speed by means of lessons, advice and advanced tests. Lessons increases their difficulty according you move forward to higher levels; besides, those are not typical boring lessons, but you can play games where you will have to type very well if you want to move forward to next lesson.

For free download Typing Master Pro Portable click link below


If my posts are useful for you، or if there is any reduction in them so kindly comment me.
Print cell range in MS Excel

Printing Ranges of Cells

You can manually select ranges of cells for printing. You also have the option of selecting multiple non-contiguous ranges for printing.
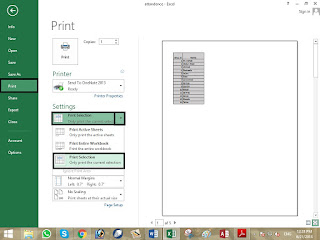
Select the Cells you want to print.
Print cell range in MS Excel


click the OFFICE BUTTON» select Print
OR
Press [Ctrl] + [P]
The Print dialog box appears.
In the Print what section, select Print Selection
Click PRINT

  The specified range of cells is printed.


If my posts are useful for you، or if there is any reduction in them so kindly comment me.
Define the Print Area in MS Excel

Defining the Print Area

By default, Excel prints all data on the current worksheet. However, you can define a specific print area from the Page Setup dialog box or the Print Area command.
Define the Print Area in MS Excel


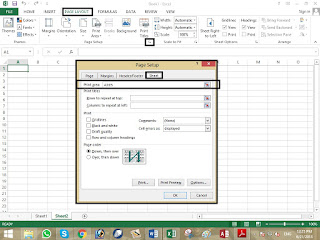
Select the Page Layout command tab In the Page Setup group, click Page Setup
The Page Setup dialog box appears.
Select the Sheet tab
In the Print Area text box, type the range of cells you want to print
OR
To select the area
Click COLLAPSE DIALOG
Select the desired range of cells
Click RESTORE DIALOG
Click OK

The print area is defined.


If my posts are useful for you، or if there is any reduction in them so kindly comment me.

Custom pages print in MS Word

Specifying the Pages to Print

This section lists options for printing and the selection or specifications that you must make in the Page range section of the Print dialog box to achieve the desired results.
Custom pages print in MS Word
Custom pages print in MS Word 


From the OFFICE BUTTON, click PRINT. The Print dialog box appears.

Select the desired page range, then click print.


If my posts are useful for you، or if there is any reduction in them so kindly comment me.

Printing in MS Word

Printing Options

To use the options described in this document, you must access the Print dialog box.
Printing in MS Word
Printing in MS Word


From the OFFICE BUTTON, click PRINT. The Print dialog box appears.
Click Print.

All the pages in Document are print.


If my posts are useful for you، or if there is any reduction in them so kindly comment me.
Sunday, June 24, 2018

INSTALLATION OF WINDOWS SEVEN

INSTALLATION OF WINDOWS SEVEN

Hardware requirements

This is minimum hardware that you need to have on your computer and should be
checked in advance of installing.
1 GHz CPU Core 2 Dou with 32 bits or 64 bits.
1 GB Ram for 32 bits or 2 GB Ram for 64 bits.
16 GB empty space hard disk for 32 bits or 20 GB for 64 bits.
DVD drive (if installing from a DVD).
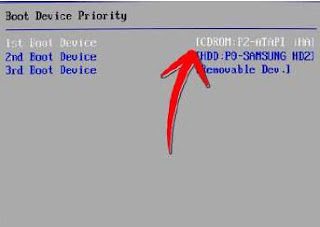
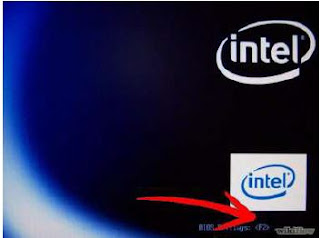
Turn your computer on then press Del or F2 (depend on your computer’s
mainboard to enter the system BIOS
INSTALLATION OF WINDOWS SEVEN


Go to Boot menu and choose Boot From CD/DVD.
INSTALLATION OF WINDOWS SEVEN


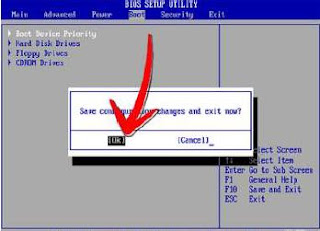
Press F10 to save the configuration and exit BIOS then reset your computer.
INSTALLATION OF WINDOWS SEVEN


Insert Windows 7 DVD into your DVD drive then start up your computer,
Press any key when press any key option appear on top off the screen
Windows 7 will be loading files.
INSTALLATION OF WINDOWS SEVEN


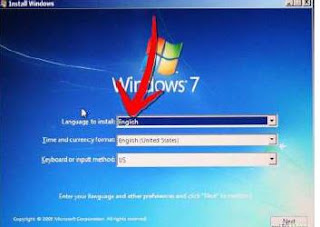
Select these parts: Language to Install, Time and currency format, Keyboard or input method. Then click Next.
INSTALLATION OF WINDOWS SEVEN


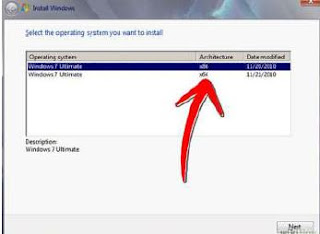
Choose Install Now if you want to install Windows 7. Choose the Windows 7
version that you want to install in 'Select the operating system you want to install' . Here
we choose Windows 7 Ultimate then click next (depending on your Windows DVD, this
step is an option).
INSTALLATION OF WINDOWS SEVEN


Click 'I accept the license terms' in 'Please read the license' then click Next.
INSTALLATION OF WINDOWS SEVEN


Choose 'Upgrade' in 'Which type of installation do you want' if you want to
upgrade from an older Windows version to Windows 7, 'Custom (advance)' if you
want to install a new version of Windows.
INSTALLATION OF WINDOWS SEVEN


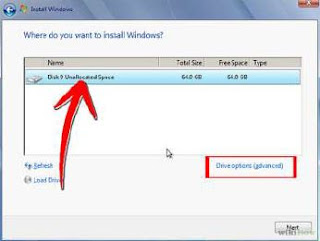
Choose Partition for installation, if your computer has only one hard disk, it will
be easy for selection, but if it has some Partition, you will have to consider which
Partition to choose.
INSTALLATION OF WINDOWS SEVEN


Wait for Installing Windows to progress. Your computer might be restarted during
the process.
INSTALLATION OF WINDOWS SEVEN


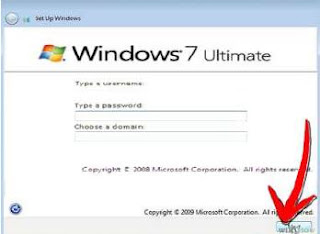
Type you’re a user account and computer name. After click Next.
INSTALLATION OF WINDOWS SEVEN


Type a password for your account, you can also Type a password hint to help in
case of forgetting the password in the future, and then click Next.
INSTALLATION OF WINDOWS SEVEN


Type in activation code or key for your license in Product key box if you have
not so leave it. Click Next.
INSTALLATION OF WINDOWS SEVEN


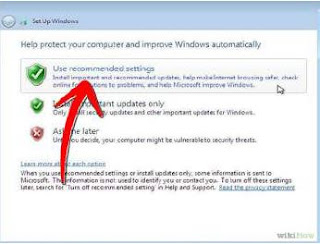
Choose how to protect your Windows. Here we choose Use recommended settings.
INSTALLATION OF WINDOWS SEVEN


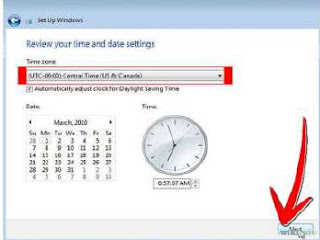
Set up your Time zone then click Next.
INSTALLATION OF WINDOWS SEVEN


If my posts are useful for you، or if there is any reduction in them so kindly comment me.