computer free courses MS Word , MS Excel , MS Access, InPage , Corel Draw , Windows Installation.

Showing posts with label InPage. Show all posts

Saturday, June 23, 2018

Insert and delete rows or columns in InPage

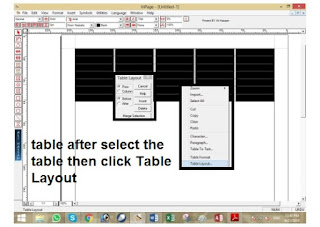
Table Layout

The Table Layout dialog allows you to carry out the following operations
Insert and delete rows or columns in InPage


Row: Allows you to insert/delete a row before or after the current row.
Column: Allows you to insert/delete a column before or after the currently selected
column.
Split or Merge Cells: Merges the currently selected cells of the table. For cells merged

with the previous merge command, this command enables you to split the cell.


If my posts are useful for you، or if there is any reduction in them so kindly comment me.

Table Format in InPage

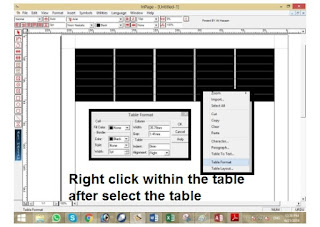
Table Format
This dialog enables you to format the table in terms of Cell Width, Cell Fill Color, Cell
Border and Indents within the Cell.
Table Format in InPage


Fill Color: You can select the cells of the table and specify their fill color. The fill color gets applied to the selected cells.
Border: You can specify the border of all cells in the currently selected table as follows.
Color: Allows you to select the color of the border from the list of colors combo box.
Style: Style of the border in terms of document wide line patterns Solid, Dotted, Dashed, etc.

Width: Thickness of the border line.


If my posts are useful for you، or if there is any reduction in them so kindly comment me.
Friday, June 22, 2018

Insert table in InPage

Working with tables using InPage

Usually tables have been created in companies and banks very often, like word Inpage
also provide you the option to create tables .You can add table in your Inpage document.
Place the cursor where you want to draw table.
Insert table in InPage


Click Insert Menu then click Table option you will see a dialog box as shown
below. (minimum column width is 0.25” and maximum 20 inches)

Type number of ROWS and Columns as you need. Then press OK.


If my posts are useful for you، or if there is any reduction in them so kindly comment me.

Auto save in InPage

Auto save in InPage

If you want to save your document automatically.“Auto Save” command. To use Auto
Save command click on
Edit menu     Preference     Application     check sign on “Auto save every minute”
oR
Press Alt+Enter Key
Auto save in InPage
Auto save in InPage


Application Preferences dialog box will appear that is shown below. Here you can give time you want to save your document automatically like that 1, 2, 3

minutes etc.


If my posts are useful for you، or if there is any reduction in them so kindly comment me.

Thursday, June 21, 2018

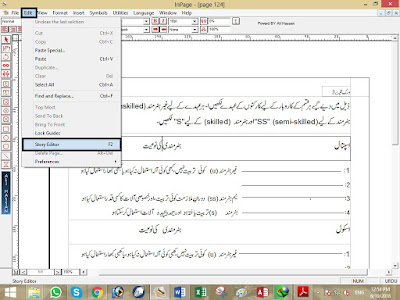
Story Editor in InPage

Story Editor

Whenever you wants to type compose or work on a book with urdu text you should click

this option available in Edit Menu -> Story Editor or you can also press F2.
Story Editor in InPage


If my posts are useful for you، or if there is any reduction in them so kindly comment me.

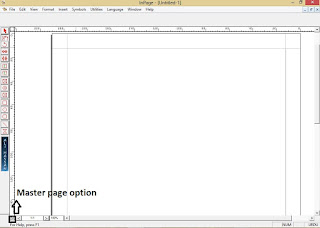
Master Page in InPage

Master Page

You can go to a Master Page by clicking on the Master Page icon in the Status Bar. If your document is double sided then you will see two master pages. On the other hand if your document is single sided then you will see only one master page. The objects that are create on the master pages appear on the corresponding document pages. 
Master Page in InPage


If the master object is modified on the master page, then this change is reflected in this master object on all the other document pages. If the master object is modified on a document page then only that master object on that document page is modified. You can enter text into a Title text box on a master page. You can not enter text in Text box.


If my posts are useful for you، or if there is any reduction in them so kindly comment me.

Tuesday, June 19, 2018

Linking and delinking tools in InPage

Text Chain

Text Boxes can be linked in a chain so as to allow the text to flow from one Text Box into another.
Linking and delinking tools in InPage


If my posts are useful for you، or if there is any reduction in them so kindly comment me.

Polygon tool in InPage

Polygon Tool

We use polygon tool to draw any desired shape. You draw a rectangular box by this tool and then modify the box in any shape with arrow tool.
Polygon tool in InPage


If my posts are useful for you، or if there is any reduction in them so kindly comment me.

Line tool in InPage

Line Tool

You can draw the line in your document in different angles & to change the width of line. You may change the color of the line and select the line pattern and to move & resize it.
Line tool in InPage
Line tool in InPage


If my posts are useful for you، or if there is any reduction in them so kindly comment me.

Friday, June 15, 2018

Graphic Boxes in InPage

Graphic Boxes


The Graphic Box enables you to draw a box with a specified border and a specified fill color.
Graphic Boxes in InPage


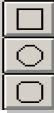
Rectangle , Rounded Rectangle and Rounded boxes. 


If my posts are useful for you، or if there is any reduction in them so kindly comment me.

Picture Boxes in InPage

Picture Boxes

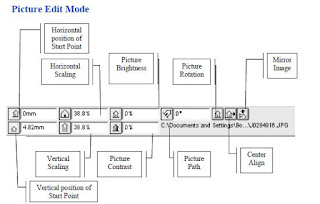
Click on the Picture Box icon and drag to draw a Picture Box. The picture box defines the bounds within which the picture can be pasted. Picture box enables two different modes one for object modification and second for its content modification. Picture can be modify or format by picture ribbon with IBEAM tool and picture box can be modify by object ribbon with Arrow Tool. You can modify picture using:
Picture Boxes in InPage


Changing Position
Resizing
Changing Brightness & Contrast
Rotating

Mirror


If my posts are useful for you، or if there is any reduction in them so kindly comment me.
Thursday, June 14, 2018

Text Box and title text box in InPage

Text Box

 The Text Box defines the bounds within which the text can be entered.
Text Box and title text box in InPage


Text box Creation

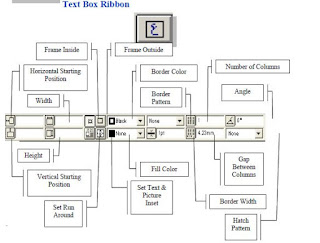
To create a Textbox first select Text Box Tool. Now you can create a textbox in the two ways with mouse and object ribbon.

Title Text Box

Title Text Box is a Text Box with text bounds only on three sides. The fourth side is floating and is actually decided by the amount of text inside the Title Text Box. the bottom is flexible. As you enter text into Title Text Box, the flexible side gets recalculated. You can also use Title Text box in Master page for inserting page number or any text / title (like header & footer).
A Title Text Box is used for headlines, page numbers etc. Following are
some features of Title Text Box.
Creating
Selecting
Moving
Resizing
Border
Columns

Title Text box Creation


If my posts are useful for you، or if there is any reduction in them so kindly comment me.

IBeam Tool in InPage

Working with InPage Tools

IBeam Tool

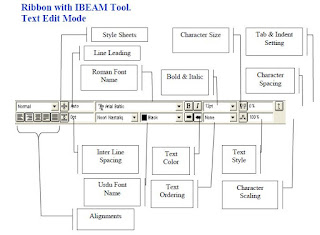
You can enter text in page or in text box with this tool. You can also edit pictures in picture boxes using IBeam tool.

Ribbon
IBeam Tool in InPage


Ribbon is bar which shows the property of selected object. It shows the options relevant to the selected tool and objects. If you are working with Ibeam tool it will show you paragraph formatting tools. When you select Arrow tool it will also show options regarding selected objects.

You can apply different formatting on paragraph using above mentioned options.


If my posts are useful for you، or if there is any reduction in them so kindly comment me.
Wednesday, June 13, 2018

Tool Strip in InPage

Tool Strip in InPage


Tool Box Tool Pane in InPage


  1. Select this Tool for the Selection to pick any object.
  2. Select this Tool for an Editing document.
  3. Select this Tool for any object Rotation.
  4. Select this Tool for linking the Text boxes.
  5. Select this Tool for remove link within the text boxes.
  6. Select this Tool for a Text Box. To type text inside a box.
  7. Select this Tool for a Title Text Box. To type new heading.
  8. Select this Tool for a Title Text Box. To type new heading.
  9. Select this Tool for a Round Rectangular Picture Box.
  10. Select this Tool for an Elliptical Rectangular Picture Box
  11. Select this Tool for a Graphic Box.
  12. Select this Tool for a Round Rectangular Graphic Box.
  13. Select this Tool for an Elliptical Graphic Box.
  14. Select this Tool for Line
  15. Select this Tool for Draw user defined Shape.


computerfreecoursetraining.blogspot.com

Tuesday, June 12, 2018

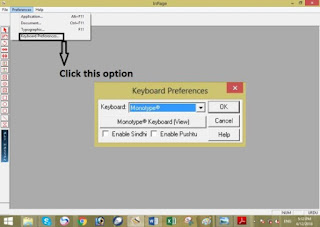
Select Phonetic Keboard

Selection of a keyboard for typing urdu


Before typing first you need to select URDU keyboard
Select Phonetic Keboard


1.      Click Edit Menu -> Preferences -> Keyboard Preferences.
2.      You will see another box as shown below to select keyboard, choose Phonetic Keyboard.

3.       You can also see the keyboard View by clicking Phonetic Keyboard(View) button


computerfreecoursetraining.blogspot.com

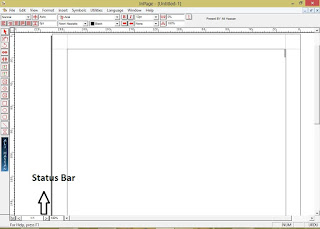
Status Bar in InPage

Status Bar

The elements of the Status Bar are:
Status Bar in InPage


Status bar is available at lower left corner of inpage application window, you can see in
above picture 1/1 that is the current page and total number of pages available in your

opened document. You can also adjust the zoom ratio for text.


computerfreecoursetraining.blogspot.com